I always saw openssl as a complicated beast.
I use it only to create some pairs of private/public keys to be used with ssh.
But when I need generate some HTTPS certificate or anything related, I’m always wondering what to do exactly. Then I Google some tutorials and copy/paste commands.
I never understood what’s the deal with all the files .key, .pem, .csr, .crt?!
I’m not an expert in openssl. I just want to demystify some of its features:
- How it is used to generate keys and certificates?
- What we can do beyond that? (random number generator, manually encrypt/decrypt files)
We’ll explain all the commands to use to generate a self-signed certificate, and we’ll add it into nginx to make it work.
Summary
Why use a certificate?
It has two purposes :
- ensure that we are on the website it claims to be
The browsers (or the operating systems) have a set of Certificate Authority root certificates installed. They use them to verify the certificates of the websites.
- encrypt the data between us and the website server
The certificates contains a public key that the browser will use to encrypt the data to send. The server will be able to decrypt them using the associated private key stored on its disk.
Why use a self-signed certificate?
To work with HTTPS in staging or development environments, it was the way to go. Those certificates were more useful before, when the HTTPS certificates were not free.
Now, we have Let’s Encrypt and https://gethttpsforfree.com/ to get free HTTPS certificates signed by a Certificate Authority. But it’s still more complex to grab than simply generate a self-signed certificates.
Step 1: create a RSA key
$ openssl genrsa -des3 -passout pass:ThEpWd -out out.key 2048
Generating RSA private key, 2048 bit long modulus
.................................................+++
.......................+++
e is 65537 (0x10001)
We start by generating a RSA key (genrsa):
- We generate a key of 2048 bits. The more the safer. The more, the slower to generate. The process has to generate 2 primes numbers and do some security checks (represented by
.and+). It will also use some random signals to always get a different result. - We encrypt it with the Triple DES cipher using a password. Here, it is provided directly with the command line. It could also be passed from a file (
file:pwd.txt). Any program trying to use the key will first need the password. It’s a secondary layer of security in case someone has access to the file. - Note that for automation, we could get into troubles. If a program wants us to type a password —because we are using an encrypted private key— such as nginx or any openssl commands, we would need a human interaction.
- The output is by default the PEM format (it’s just the base64 of the DER format which is binary). PEM stands for Privacy-Enhanced Mail.https://tools.ietf.org/html/rfc1421. It’s a very old format.
A simpler command without encryption would be:
$ openssl genrsa -out out.key 2048Encrypted, the key looks like this (RSA PRIVATE KEY with headers):
-----BEGIN RSA PRIVATE KEY-----
Proc-Type: 4,ENCRYPTED
DEK-Info: DES-EDE3-CBC,7FC8C1B4B0FAC94A
6wj6oRh3NDj4aI5U2tI3YxhyZX++a9nhQ3c6uznDidO9pH91wYmMznfeLTNWLA5f
Q/X5cDWFUY05XNVLDCuVosLumJ76fLi6yq/ZZ3rCgbglV415jdc3ozl9q1UANtp0
…
-----END RSA PRIVATE KEY-----
It’s possible to see the “content” of the key using the tool rsa —it’s all about mathematics— :
$ openssl rsa -noout -text -inform PEM -in out.key
Private-Key: (2048 bit)
modulus:
00:b2:e0:a7:95:98:f6:26:8c:32:09:04:a6:ac:9a:
42:b8:1e:43:de:fe:f6:c1:f1:1a:0e:b2:0c:86:47:
35:6b:46:e4:46:36:bf:ef:cc:34:c0:09:9f:77:eb:
...
publicExponent: 65537 (0x10001)
...
The full synopsis of genrsa is :
# genrsa - generate an RSA private key
openssl genrsa [-out filename] [-passout arg] [-des] [-des3] [-idea]
               [-f4] [-3] [-rand file(s)] [-engine id] [numbits]
By default, openssl outputs the PEM format.
It’s a plain ASCII file with some specific header and footer, and a big string in-between. It’s useful to send them through email (not the private keys of course) along some text, or even to send a message encrypted (PGP).
Bonus: create a key from another key
rsa can also be used to convert any key to any other key format.
For instance, we could generate another private key based on our first:
$ openssl rsa -passin pass:ThEpWd -in out.key -out out-next.keyI’m not sure why. Is that more secured? I already stumbled upon this technique to create a certificate, instead of using a password protected key generated by genrsa. Please, let me know!
The full synopsis of rsa is :
# rsa — RSA key processing tool
openssl rsa [-inform PEM|NET|DER] [-outform PEM|NET|DER] [-in filename] [-passin arg]
            [-out filename] [-passout arg] [-sgckey] [-des] [-des3] [-idea] [-text]
            [-noout] [-modulus] [-check] [-pubin] [-pubout] [-engine id]
Step 2: create a certificate request
Now that we have our private key, we are going to create a certificate request.
Both the key and the certificate request are needed to create a certificate.
It’s necessary to request one because we are not supposed to be the one who signs the certificate. It is the role of the Certificate Authorities.
We use openssl req to generate a .csr (Certificate Signing Request).
$ openssl req -new -key out.key -out out.csr -sha256
You are about to be asked to enter information that will be incorporated
into your certificate request.
What you are about to enter is what is called a Distinguished Name or a DN.
There are quite a few fields but you can leave some blank
For some fields there will be a default value,
If you enter ‘.', the field will be left blank.
-----
Country Name (2 letter code) [AU]:FR
State or Province Name (full name) [Some-State]:
Locality Name (eg, city) []:
Organization Name (eg, company) [Internet Widgits Pty Ltd]:
Organizational Unit Name (eg, section) []:
Common Name (e.g. server FQDN or YOUR name) []:
...- We provide the private key to use
out.key. - We fulfill several metadata about the company (if self-signed, we don’t care a lot). They will be identifiable in the certificate.
- We use a SHA-256 hash. If unspecified, it’s SHA-1 that will be used. SHA-1 creates a hash of 160 bits, and is deprecated due to some weaknesses. For instance, Chrome clearly displays a warning if the certificate is still using SHA-1. The new “standard” is SHA-256: it creates a hash of 256 bits.
The certificate request looks like this (CERTIFICATE REQUEST):
-----BEGIN CERTIFICATE REQUEST-----
MIICxTCCAa0CAQAwaTELMAkGA1UEBhMCRlIxDjAMBgNVBAgMBVBhcmlzMQ0wCwYD
VQQKDAROb25lMQ0wCwYDVQQLDAROb25lMQ0wCwYDVQQDDARKb2huMR0wGwYJKoZI
...
-----END CERTIFICATE REQUEST-----
We can verify what’s inside:
$ openssl req -in out.csr -text -verify -noout
verify OK
Certificate Request:
 Data:
 Version: 0 (0x0)
 Subject: C=FR, ST=Some-State, L=Paris, O=Internet Widgits Pty Ltd, CN=John Doe
...
The short synopsis of req is :
# req - PKCS 10 certificate request and certificate generating utility.
openssl req [-inform PEM|DER] [-outform PEM|DER] [-in filename] [-out filename] [-text]
            [-pubkey] [-noout] [-verify] [-new] [-key filename] [-keyform PEM|DER]
            [-keyout filename] [-x509] [-days n]
PKCS stands for Public Key Cryptographic Standards.
PKCS#10 is the format to request a certificate (https://tools.ietf.org/html/rfc2986).
A faster alternative — TLDR
It’s possible to create a certificate request with a private key in one shot:
$ openssl req -new -out out.csr -sha256By default, it will generate a RSA 2048 bits key, ask for a pass-phrase, and the private key will be output to privkey.pem.
To get rid of the defaults, we can use:
$ openssl req -new -nodes -out out.csr -keyout out.key -sha256-nodesto not encrypt the key (no pass-phrase)-keyout [filename]instead ofprivkey.pem
All the defaults of openssl are configurable: /etc/ssl/openssl.cnf.
Step 3: generate the self-signed certificate
Finally, we create a self-signed certificate from our certificate request.
$ openssl x509 -req -in out.csr -signkey out.key -out out.crt -days 365 -sha256
Signature ok
subject=/C=AU/ST=Some-State/O=Internet Widgits Pty Ltd
Getting Private key- x509 is all about certificates standards.
- We provide the certificate request (
-req -in) and the private key (that makes it self-signed). - We set it valid for a year.
- We do not forget to use SHA-256 to avoid browsers’ deprecation warning.
The certificate looks like this:
-----BEGIN CERTIFICATE-----
MIIDTjCCAjYCCQD5/NymfWIDMzANBgkqhkiG9w0BAQsFADBpMQswCQYDVQQGEwJG
UjEOMAwGA1UECAwFUGFyaXMxDTALBgNVBAoMBE5vbmUxDTALBgNVBAsMBE5vbmUx
...
-----END CERTIFICATE-----
Again, we can inspect the content:
$ openssl x509 -in out.crt -text -noout
Certificate:
 Data:
  Version: 1 (0x0)
  Serial Number: 14039925222936737604 (0xc2d7d59a8230f744)
 Signature Algorithm: sha1WithRSAEncryption
  Issuer: C=AU, ST=Some-State, O=Internet Widgits Pty Ltd
  Validity
   Not Before: Jul 22 00:07:52 2016 GMT
   Not After : Jul 22 00:07:52 2017 GMT
 ...
A short synopsis of x509 is:
# x509 — Certificate display and signing utility
openssl x509 [-inform DER|PEM|NET] [-outform DER|PEM|NET] [-keyform DER|PEM]
             [-in filename] [-out filename] [-startdate] [-enddate]
             [-days arg] [-signkey filename] [-req] ...
Faster alternative — TLDR
It is possible to generate a self-signed certificate with its private key in one shot:
$ openssl req -x509 -nodes -new -keyout out.key -out out.crt -sha256We add -x509 to generate a self signed certificate and not a certificate request (if unspecified).
Aparte: other openssl tools
Let’s just see some other openssl’s tools before going back to nginx and the certificate.
Random generator
If we have some bash and need nice generated strings (instead of $RANDOM or /dev/urandom), we can use rand:
$ openssl rand -hex 40
c15b5469946564a704777286ad81f6ca0c9c49a36c45a159174cc028c953f3ab1434977927fc9f11b6b45f4194
$ openssl rand 100 | od -An
 062351 017220 011763 071125 020723 127621 022632 037276
 066565 114650 073202 106612 120052 111556 075054 033665
Encrypt/Decrypt anything
enc can be used to encrypt and decrypt anything using any encryption algorithm existing on Earth.
For instance, encoding/decoding in base64:
$ openssl enc -base64
use base64 to encode me!
[Ctrl+D]
dXNlIGJhc2U2NCB0byBlbmNvZGUgbWUhCg==
$ openssl enc -base64 -d
dXNlIGJhc2U2NCB0byBlbmNvZGUgbWUhCg==
[Ctrl+D]
use base64 to encode me!It’s a bit useless because anybody can decrypt it, it’s not password-protected.
aes-256-cbc (NSA approved) does a nicer job:
$ openssl enc -aes-256-cbc -out encrypted.txt
enter aes-256-cbc encryption password:
Verifying — enter aes-256-cbc encryption password:
encrypt me!
[Ctrl+D]
$ xxd encrypted.txt
0000000: 5361 6c74 6564 5f5f 9448 1158 e593 c2b7 Salted__.H.X….
0000010: 67fb 442d af21 75ad 80e3 483a ff37 d8f9 g.D-.!u…H:.7..$ openssl enc -aes-256-cbc -in encrypted.txt -d
enter aes-256-cbc decryption password:
encrypt me!Nginx
Back to our certificate, let’s make it run on our website !
A minimal subset of changes to nginx would be to add this to one’s configuration :
server {
  listen 443;
  ssl on;
  ssl_certificate /tmp/out.crt;
  ssl_certificate_key /tmp/out.key;
}
We should not use /tmp of course, instead consider using /etc/ssl/{cert,private} or /usr/local/share/ca-certificates to store our files.
Then we restart nginx and enter the passphrase if any (beware of automation):
$ sudo service nginx restart
Restarting nginx:
Enter PEM pass phrase:
Enter PEM pass phrase:
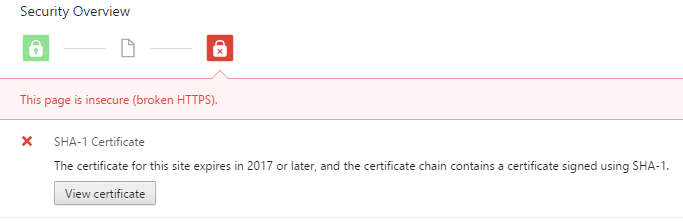
nginx.Then we will get a scary error in our browser.
Either we won’t be able to do anything, or we will have a link at the bottom to continue.

If we have no link to continue, we can try to manually trust the certificate.
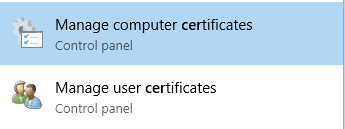
On Windows, we can double-click on the .crt file to install it, or go manually in the stores :
On Debian and such, we can copy it to the appropriate folder :
$ sudo cp out.crt /usr/local/share/ca-certificates/out.crt
$ sudo update-ca-certificates
Updating certificates in /etc/ssl/certs…
1 added, 0 removed; done.
Running hooks in /etc/ca-certificates/update.d….done.
A better nginx configuration
nginx’s ssl configuration is a very important topic, except when dealing with self-signed certificates because they should not be exposed to the Internet.
Otherwise, the following gist has tons of advices for a better ssl configuration: https://gist.github.com/plentz/6737338 (1737 stars!)
One common thing to add, as it suggests, is to generate and use a dhparam file. This adds more randomness to the process and reduce the risk of disclosures.
Last note: to test a installed certificate and nginx’s configuration, a good start is to submit the page address to https://www.ssllabs.com/ssltest/.
openssl is not scary anymore.